Showing posts with label painting. Show all posts

Saturday, January 2, 2010

Christmas Tree in Forest Painting

In lesson 5 of the Learn and Master Painting course, we start by practicing with a gradient. I'm not going to bother photographing my gradient work. Then we learn how to make hard and soft edges of different types. The teacher shows many different examples of hard, soft, and lost edges and you can follow along and make your own. It is great how she takes painting step by step and I like how unlike a real class, I can go back - months later - and watch a section of the DVD painting video again.

Christmas Tree in Forest Painting by Christopher Johnson


Lesson 5 ends with the painting of an evergreen tree with other trees merging in the background. Her evergreen tree is much prettier than mine, but I guess that is to be expected.  In this painting she shows us how to use negative space around objects and we continue to practice varied strokes.  We also learn massing to create the tree in the middle of the work.

Autumn Tree Painting

The autumn tree painting is part of lesson 4 of the Learn and Master Painting oil painting course that I got. It is a very complete course and if you are learning to paint, want to see how another painter works, or want to get started like me coming from another medium, I recommend it.

Autumn Tree Painting by Christopher Johnson


In Lesson 4, the goal is to paint a believable object(tree with autumn foliage and shadow) and we are practicing varied strokes.  In the DVD video, the teacher shows how to make varied strokes and explains how it is better to have varied strokes when painting. She also explains how edges should overlap instead of painting up to a line.  It isn't clear in writing, but she shows different examples of good and bad edges so it is so easy to understand.

My problem in this case is that while I do have Burnt Umber, I didn't have Cadmium Orange for the lesson. In fact, I didn't have any orange paint at all so instead of  making a trip to the art supply store, I decided to see if I could make an orange like color mixing some of the other paints!  I took a simple lesson and made it complicated, but in the end, I had my autumn tree with shadow and it did have autumn colors. When I finally buy Cadmium Orange, I'll make another painting of this lesson.

I decided after finishing the tree that I wanted more than the shadow below the tree. Improvising beyond the lesson, I covered the ground with left over "leaf paint"  from my palette.

Friday, January 1, 2010

Mushrooms Painting

The mushrooms painting done in acrylic is one of my favorite paintings. It took several hours to do just like it would have taken me if it were a photo manipulation.

Mushrooms Painting by Christopher Johnson


I was trying to make a realistic painting with very recognizable mushrooms however I didn't want it to be as complicated as real life would make it so I simplified the background and I only painted a few mushrooms. I gave them brown-tan-white tops and white stems. The ground was simplified to a dark brown instead of the normal leaf and twig littler you'd probably expect to find in that setting.

The trees in the background are simplified down to brown lines for branches and short wide strokes for leaves. If you are interested in learning to paint, check out the Learn and Master Painting Course. I use it at home.
Learn & Master Painting - the world's most complete video instruction course for painting

Moonrise on a Distant Planet - Robot Painting

Moonrise on a distant plant is my second robot artwork (the first was a digital drawing), and I used acrylic paint.  It wasn't part of the Learn and Master Painting course that I've been learning to paint with, but I did try to practice different strokes, brush technique, and color mixing as shown in the course.

Moonrise on a Distant Planet Painting by Christopher Johnson


Unlike my previous works, I decided to first make a quick sketch outline of the robot basic shape and then I started painting over it in blocks finishing with the sky and moonrise. No, I didn't really try to keep inside the lines since the painting course doesn't show that as being correct. Instead I used my outline sketch as a guide and quite a few details changed as I worked.  It was loosely inspired by a famous robot, but almost every aspect of this work is different from the robot that inspired it.

Winter Tree Branches and Tree Branch Study

Due to problems with my Internet provider I have several paintings to add to the blog. Enjoy!

Winter Tree Branches Painting by Christopher Johnson


As part of the Learn and Master Painting course, I had to learn how to make different brush strokes. I couldn't practice the strokes exactly as instructed since I don't have an easel I can stand in front of while painting, but I tried.  I later made a more free flowing winter tree branch artwork for fun with a smaller wood panel.

Winter Tree Branch Study by Christopher Johnson


The study uses oil paint while the winter tree branches artwork is in acrylic.  The colors are different in the works because even though the tubes show the same color, they are not the same. The burnt umber oil paint has a strong red tone while the burnt umber acrylic was more neutral. There is also some more variation in color because I added more white to the lighter trees in the acrylic version. I didn't feel I had enough contrast in the winter tree branches study.  I am sure I will try some more of these in the future!

Friday, November 27, 2009

Ice Cream Cone - Second Oil Painting

I was watching some of the videos in the Learn and Master painting course where Gayle was showing how to make different brush strokes and I was trying them and then I felt inspired to improvise and I wanted to paint a cone and well a cone by its self is a little too abstract so I turned it into an ice-cream cone.

I used a pale yellow,  brown, white, and blue. I mixed all of the non-white colors with white to get light shades. The ice-cream part of the painting is white with a touch of yellow. It is a little too creamy because I forgot that some of the top of the cone would get blended up.  It takes almost no color paint with white to make a light color. I'd say a "drop", but oil paint is very thick.

The cone and the background were painted with the paint thinned with solvent since I don't have medium.  I have a list of things I need to buy, but I have already gone past my original budget for the year so I hope I'll get some art sales soon!

I kept the paint on the ice-cream thicker. Not out-of-the-tube thick, but more like mayonnaise thick and I just kept adding it until it looked rich and delicious. The surface there is about 1mm higher than the rest of the painting.   I wonder if that would qualify as impasto?

Ice Cream Cone - Second Oil Painting by Christopher Johnson

Saturday, November 21, 2009

Winter Pine Tree - Acrylic PaintingPino en el invierno - Acrilico

This was my second attempt at painting with acrylic paints and my first 6x8 (inches) with acrylic paint. It was done in layers over three days. I guess I spent about 3-4 hours on it. I imagine someone with experience could have done it much faster.

Winter Pine Tree - Acrylic Painting by Christopher Johnson


On the second day I was very unhappy with it and almost painted it over with white to start from zero.  I am happy to say that I resisted and I really like the results. I hope you like it too.  It is supposed to look like a pine tree with the light from behind and a subdued sky which fades to white. Since it is supposed to be a Christmas like cold climate winter scene, the ground is white to represent a heavy cover of snow. Would you like to learn to paint?

Wednesday, November 18, 2009

The Painting Course Arrived

I'm very excited today because my Learn and master Painting course arrived just a few hours ago.  I asked in a blog post for feedback on this course and what it offers.  While I agree that a course isn't absolutely necessary and while several friends offered to answer questions (thank  you Facebook friends! I'll still ask questions.), I really didn't want to be constantly asking more than one question a day and a little voice kept asking me if I was really messing up this last week since I got some very basic supplies.  I got just the course not the kit including paints and brushes.

Learn-and-Master-Painting-Box-Cover

Impressive elegant presentation


I haven't yet started viewing the course videos, but just opening the box was amazing. If the course is as good as the packaging, I'll be off to a great start in developing my oil painting skills.

The box acts like a binder with a flap that folds over the top right. The flap seems to be felt lined. When the flap is lifted the top folds open to the left and there is a pocket with the lesson book.  The DVDs are all in plastic sleeves. The inside back cover says what the course contains and how to get started (watch the introduction video).

Learn-and-Master-Painting-Box-Open

Quality Lesson book


The lesson book for Learn & Master Painting is in full color with great photos to help explain everything.   My biggest question during the last few days was how to organize the palette, mix colors on it, and how to clean brushes and store paints and solvents.  The book actually covered Those topics on five pages at the beginning of the lesson book.  I might have been able to find that information online, but not all together and not with all those great photos so I could see what was being explained.

Painting course packaging summary


The packaging is both elegant and practical. I can see that a lot of care was put into the design yet it is very practical because it can be folded back up and kept on a shelf in the amount of space a photo album or art book would take.  The biggest problem I've had with multi-disk/multi-CD collections was that some would always get lost. I really admire the designer who didn't cut costs and thought about the user taking the painting course.

Thursday, November 5, 2009

Learn and Master Painting Course

I normally don't include posts about specific products since I have the shop page, but I'd really appreciate the feedback from the painting experts here about this home study system for learning how to paint. Quite a few of you know from Facebook that I am very interested in learning how to paint and I've started saving up for supplies. I don't have any painting supplies at all and I am not aware of any painters living nearby who would let me observe them work. Yes, I'm sure there are painters in Mexico City, but it is a huge place.

Painting Learning System and Supply Kit

This kit comes with 20 DVDs with videos of a painter showing how she does it, color theory, setting up the work area, using reference photos, brushwork technique, etc.  and it comes with brushes and oil paint of the "Winsor and Newton" brand. The DVDs divide the painting into lessons and there are tasks to carryout.  I watched a video clip on the sales site on using the palette to get light/dark variations with yellow and it was cool.    What do you think, is "Learn & Master Painting" worth it? The price for the complete kit was $349 with an option to buy it in several payments. Click on the link to check the current price.


Wednesday, September 30, 2009

Art Discipline or the Rise of the Phoenix -part one

A long time ago, 2001 I think it was, Mrs Elsa Clarke, one of my lecturers for design studio told us on our very first day of class  that an artist was always hungry; an artist was never satisfied with learning this or achieving that but was always looking beyond to the next level; always seeking to challenge himself. Always seeking to grow.

Those words stayed with me and I have to admit they became my mantra and opening segue when talking to my new class of students every year. Yes I make sure and say that she told it to us and yes when she first said it she told us who told  her but I don't remember that part and anyway that's not what's important. The words stayed with me because I  realised just how profound and accurate they were when I made the decision to become a professional artist.

People who purchase or view  art sometimes live in this bubble which informs them -rather erroneously - that making art is 'easy' and artists sit around all day. They don't need to research or think or plan or anything because  paintings just fall from the sky like manna from heaven.What they do is 'easy'; making art is an easy job. This is then passed on to the wee ones who come in expecting to just sit back and allow artistic success to  fall on them.  Maybe that's our fault. We are good at what we do so we make it look effortless.

Well in this blog post, my mission will be to dispel  all those myths. I can do it in one statement:

ART IS DOWNRIGHT HARD!


I'll spare some time to explain and I'll even do a follow-up with an artist who has experienced some measure of success and who is in a position to share thoughts on the subject.

It takes discipline to make art. I put that word in bold because it is so easily discounted. It takes long hours of research, planning and re-planning (did I just make up a word?) Now don't get me wrong I'm not trying to spoil the romance for those of you who are just coming into this noble profession but rather enhance it. There are some times when you'll pick up the brush and a painting will almost literally fall on your canvas  and you treasure those moments because you can get a really great feeling especially if it's a good painting but that's the exception and not the rule. The rule is research. The rule is make sure and observe all the elements of art: line, shape, colour, value, texture, space and the principles of harmony, balance, rhythm, contrast, emphasis, unity. Not to mention composition and perspective and a solid drawing if that's what you do and good knowledge of your tools and how to manipulate them to enhance your work. The rule is start over if you are not achieving the goals or if it just plain sucks. The rule is make the complex compositions appear simple; uncomplicated.

Artists worth their salt study constantly; reading good art books and attending workshops. They put in long hours at their easel and develop thick coats to ward off attacks by errant art critics, both knowledgeable and otherwise. They are ever changing, ever growing.

In addition to the long painting hours artists do their own marketing and must also deal with the let down that comes from rejections and harsh critiques and continue producing and going back for more. Today's artist is a creatively genius,  computer savvy marketing exec.  (Please note that the art still comes first)

[caption id="attachment_1183" align="alignright" width="150" caption="Anthony Gonzalez, Student (Trinidad & Tobago)The Creative War: Rise of the Phoenix; 17x14; markers and paint on paper"]Anthony Gonzalez, Student (Trinidad & Tobago)The Creative War: Rise of the Phoenix; 17x14; markers and paint on paper[/caption]

I can illustrate a true artist in this sense (Hopefully you will get the idea from my poetic imagery) As she paints her masterpiece, she divests part of herself unto the canvas. With sweat pouring down her brow she wages war against faulty composition and makes sure her colours are playing nicely with each other. If she's a plein aire painter, she must also wage war against the elements as she feverishly tries to get everything down before the light changes and if she's an abstract artist she must chase the ghosts and phantoms and dreams that drive her to create while still observing the artistic elements and principles. Finally she sees the 'end' in sight and at the final stroke of the brush, she hesitantly signs her name, still wondering if she is truly finished ( She may pass by it tomorrow and see something that needs 'fixing' and pick up the brush again).

That painting marks the end of that part of herself that she has given to that piece of art; that piece of history. Tomorrow she will rise again, like the mythical phoenix, reborn, renewed; a new idea to conceive, and a new landscape to forge; a new 'ghost' to conquer.

It takes discipline and determination to become an artist. Sweat, tears and a hard skin.  Talent is important and necessary but it must also be coupled with hard work. The saying "Hard work reaps rewards" is just as important for making art. And that's the romance.

Wednesday, August 26, 2009

Reply to Create to make a statement or sell? The great debate.

This is an interesting question. Each artist will have a different and usually very emotional answer.

Here, in short, is my answer to this question. I create for the sheer joy and pleasure of creating. I create for myself. For me, the creative process is spiritually personal and is a meditation. Being still and meditating allows the creative juices in me to start flowing. Creating my art allows me to be in the present NOW. I focus only on painting and allow all else to fade away. Worries, plans, I should do, etc. I attain a level of peace that I get no place else. Creating is a selfish act most satisfying. I create for me.

That being said, I humbly offer my paintings for others to see and hopefully enjoy. It is my wish that they find in my painting a sense of  beauty, peace, something that moves them, and a feeling of  'wow, I really like this' or 'jeez, what was she thinking?' I would hope the first reaction is obtained. Although, whatever one feels about my artwork is OK. They were moved in some way.  They may or may not purchase my work. Either is fine. If they do, I am always very pleased. If they do not, that is beautiful too because that was not the painting's purpose.

Casey Shannon

Tuesday, August 25, 2009

Watercolor Painting with a limited palette

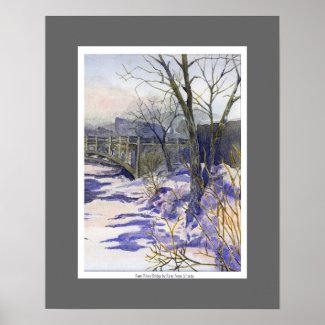
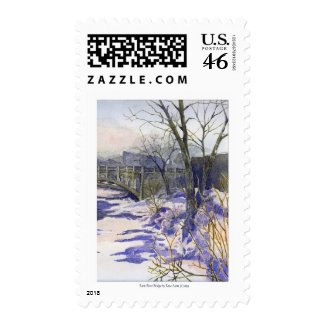
I painted the Rum River Bridge painting after taking a class on mixing colors in watercolor. The course taught me about using a limited palette of the three primary colors, red, yellow and blue to create all the colors in the painting.   The advantage of this method is that all of your colors are unified and you have greater control in color mixing. To start using a limited palette, first you must experiment with your paints.

Rum River Bridge Poster at Zazzle


Discover which three primary colors mixed together will create a true grey or a shade of brown.

Begin by selecting your truest red, yellow and blue. Then, start making a color mixing chart, labeling each color as you mix. Mix red with yellow to create varieties of orange, yellow and blue to create varieties of green and blue and red to create varieties of violet.

Then start mixing the compliments to create varieties of Grey, which are used for the shadow colors in your paintings. Mix orange with blue to creates shades of orange and blue, mix green with red to create shades of red and green and mix violet with yellow to create shades of violet and yellow.

Below is my limited palette color mixing chart that I created using three different reds, Cadmium Red, Brilliant Red & Crimson, three different blues, Ultramarine Blue, Cobalt Blue and Phalo Blue, and three different yellows, Medium Yellow, Lemon Yellow and Yellow Ochre. As you can see, each has their own strengths and weaknesses, it is up to you to decide what colors to add to your palette.

When you have discovered your limited palette choices, you are ready to get started.

Rum River Bridge Poster at Zazzle

Rum River Bridge Postage

Tuesday, August 11, 2009

Sumi-e and Haiku

Last post, I left you with the thought that the art of Sumi-e was directly related to the art of Haiku. Let's take a closer look at this concept. Since Sumi-e is minimalist painting and Haiku is minimalist writing, it would be reasonable to say that the two art forms would naturally support one another and often be studied and exhibited together.

In Japanese, haiku are traditionally printed in a single vertical line, while haiku in English usually appear in three lines, to parallel the three metrical phrases of Japanese haiku. Such as :

The fragrance!
Though I know not
Whence it comes.
~ Basho

Previously called hokku, haiku was given its current name by the Japanese writer Masaoka Shiki at the end of the 19th century. The typical length of haiku appearing in the main English-language journals is 10–14 syllables and have a  symmetrical line arrangement such as 5-7-5 or 3-5-3.  Some haiku poets are concerned with their haiku being expressed in one breath and the extent to which their haiku focus on "showing" as opposed to "telling".  Therefore haiku is concerned with showing minimally as is Sumi-e.

Now let's look at the undesputed master of the haiku, Matsuo Bashō, an Edo-period Japanese haiku poet. Bashō's poetry was quickly recognized for it's simple and natural style. Sumi-e is recognized for it's simple and elegant brush strokes. A natural combination.

Let me show you an example of how I have used haiku in combination with contemporary sumi-e. For me as an artist, usually the haiku inspires the sumi-e. This results in a simple creative expression and profound experience.  However, I have occasionally painted the sumi-e first and then combined the result with haiku. The following haiku is considered to be Basho's most famous haiku of all.

At the ancient pond,
a frog plunges into,
the sound of water.
~ Basho

Sound of Water by Casey Shannon


Saturday, August 8, 2009

Painting -101

-101. I say this number with a negative, because much of painting can begin in the artist's head before a canvas is primed or a brush is even picked up. Many artists have what I call "fear of the white." By this, I mean a paralysis that can overcome the artist upon having a new, fresh, clean, white surface to work with. They fear making mistakes. They might ask themselves, "What if it turns out wrong?" In this short essay, I will detail what I do and why I NEVER fear the white. Make friends with the unknown.

I have never feared the white. It doesn't intimidate me, because I know there is a painting (or drawing, if it's paper) just waiting to come out of the surface. My methods might sound far out to many of you, but it's what works for me, and if even one person who reads this never fears the white again because they try my method, then this post is very worthwhile. This technique is primarily used for any imaginary, abstract, surreal, non-classical type of painting, but I have also consistently applied it with realism, i.e. life drawing, with much success.

Before you even begin to look at brushes or colors, pick up your canvas and put it on your easel or table, whatever work surface you have. Humor me, and try this. Place your non-dominant hand on the canvas (for most of you, this will be your left hand). Close your eyes. Move your hand around in a circular motion, perhaps a figure 8, whatever feels comfortable to you. At some point, your hand will naturally stop. Before you open your eyes, remember that feeling! Capture that defining calm and make it part of you. Every canvas you do will have a different location like this. Open your eyes, remember the spot, and go mix your colors. When you're mixing, remember that feeling you had when you stopped on your canvas. If this method doesn't work, try to paint or color your surface a different hue based upon the dominant background color of your work, and make it uniform.

If you don't want to burn a canvas or make an error, simply try this exercise with a piece of paper and any instrument you choose (pencil, pen, paints). Free yourself, play around and have fun. That's what art is all about anyways; enjoy your passion and don't let fear of the white mess with your joy!